
Fast Response, Quality Service, 24/7 Technical Monitoring
Navigating a growing number of SharePoint sites can quickly become overwhelming, especially without a clear structure in place. But, SharePoint hub navigation changes how organisations connect and organise related sites across their digital workplace, creating a more unified, intuitive experience for users.
Unlike traditional site navigation, which appears on the left-hand side of Team Sites, hub navigation is displayed consistently at the top of every associated site, making it easier for users to move between connected areas like a “Corporate Hub,” “HR Hub,” or “Projects Hub.”
Ultimately, hub navigation serves as the global menu your team relies on to move seamlessly between departments, resources, and teams. When set up correctly, it improves efficiency, reduces confusion, and helps everyone get the most out of your SharePoint environment.
This guide shows you how to set up and customise your SharePoint hub navigation to create an intuitive, organised intranet experience. We’ll cover the key differences between site and hub navigation, walk through the setup process step by step, and share best practices for structuring navigation that scales with your organisation’s needs.
In today’s modern SharePoint environments, hub sites play a central role in connecting related team and communication sites into a cohesive intranet experience. If you’re aiming to build an intuitive and scalable digital workplace, understanding how hub navigation works is key.
Hub navigation provides a shared navigation bar that sits at the top of all sites connected to a hub. Unlike traditional hierarchical site structures, hubs offer a flat, flexible framework, organising sites by department, project, region, or business unit.
This top-level navigation helps users move easily between related sites, without having to memorise URLs or navigate a maze of menus. It supports up to three levels of menu depth, and you can choose between two layout styles:
When users search from a hub site, results automatically include content from all associated sites, making it easier to discover what they need across your environment.
Although they might look similar at first glance, hub navigation and site navigation serve different purposes:
Feature | Site Navigation | Hub Navigation |
Location | Left-side by default on Team Sites; top on Communication Sites | Always appears as a horizontal bar at the top |
Scope | Unique to each site | Shared across all associated sites |
Control | Managed individually by site owners | Centrally managed by the hub owner |
Consistency | Changes from site to site | Remains consistent across all connected sites |
Association | Independent by default | Becomes part of the hub when connected manually |
Hub navigation is best used when you need consistent global navigation across multiple related sites. It’s ideal for:
If users need to move between HR, IT, Marketing, and other areas without losing their place, hub navigation brings it all together.
On the other hand, site navigation works well for content that’s specific to one site. If the site is already connected to a hub, you might even choose to simplify or remove the site’s local navigation to avoid overlap and keep things clean.

Creating a well-structured SharePoint hub site starts with configuring its navigation bar. Done right, hub navigation helps users move effortlessly between related sites and find what they need without frustration.
Before you can set up hub navigation, you need to register your chosen site as a hub site. This process is done through the SharePoint Admin Center, and you’ll need admin-level permissions (SharePoint Administrator or above) to get started.
While any site can technically become a hub, communication sites are typically the best choice. If you choose a classic team site, keep in mind that hub navigation will only display on modern pages.
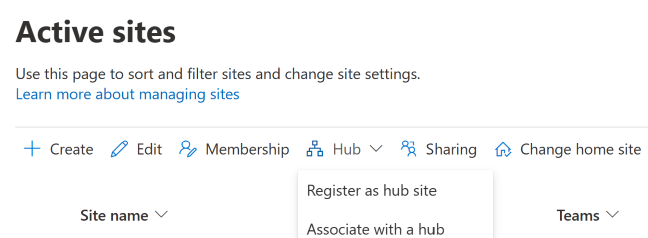
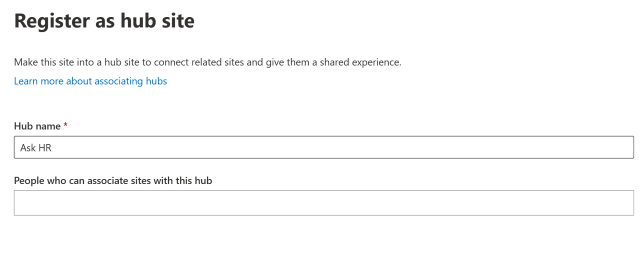
To register a site as a hub:
You can create up to 2,000 hub sites per organisation. There’s no limit on how many sites can be associated with a single hub.
Once your site is registered as a hub, it’s time to set up the navigation bar that appears across all connected sites. Hub site owners are responsible for manually building this navigation to ensure consistency and clarity.
To edit the hub navigation bar:
You can choose from two layout options:
Tip: Use labels without links to group related items and add sub-links (up to two levels deep) for better organisation.

One of the best features of SharePoint hub sites is shared branding. When a site is associated with a hub, it inherits the hub’s theme and colour scheme, giving users a consistent visual experience across connected sites.
To apply hub branding:
Keep in mind:
Branding goes hand in hand with navigation. When users move between hub-connected sites, they’ll not only see consistent navigation but also a familiar visual identity, helping reinforce structure, trust, and clarity across your digital workspace.
When it comes to SharePoint hub navigation, structure is everything. A well-planned hub setup improves usability and also enhances content discovery, reduces confusion, and supports long-term growth. Taking a strategic approach now means fewer headaches later.
While it’s possible to create a single hub for your entire organisation, this approach often leads to bloated navigation menus and reduced search efficiency. A single hub may offer consistent top-level navigation, but as the number of sites grows, it can become difficult to manage and overwhelming for users.
Instead, a multi-hub strategy usually offers better results. By creating separate hubs for distinct areas, like departments, regions, or initiatives, you can keep navigation focused and relevant. This also improves search experiences, since users can filter results within the context of a specific hub.
Thanks to hub-to-hub associations, you can now connect multiple hubs into a larger, organised network. Content and navigation can flow across hubs, enabling users to search and view information up to three levels deep within your hub hierarchy.
The most effective SharePoint hub structures are built around meaningful organisational attributes. Depending on your company’s needs, you might organise hubs by:
This type of organisation helps users intuitively understand where they are and where to find what they need. In more complex scenarios, you may need to combine multiple structures, such as associating functional teams within regional hubs. If that’s the case, consider cross-linking key hubs to maintain easy access and logical navigation paths.
Even though SharePoint supports up to 500 navigation links, that doesn’t mean you should use them all. For best performance and usability, aim to keep navigation under 100 links, and only include what’s truly relevant.
Here are some tips to keep navigation clean and scalable:
Effective permission management is essential to building a secure and user-friendly SharePoint hub experience. When multiple site collections are connected under a single hub, understanding how permissions and visibility settings work ensures users see the right content, without exposing sensitive information or cluttering the interface.
One option available in SharePoint is the ability to sync hub permissions across associated sites. This helps maintain a unified access model by granting hub-level visitors consistent access across all linked sites.
Here’s how it works:
Once activated, SharePoint automatically creates a “Hub Visitors” group with read-only access. This group can include up to 10 users or Microsoft 365 groups and is added to all participating sites.
While convenient, this feature should be used carefully, especially in environments with sensitive data.
Although syncing permissions sounds helpful, it also introduces complexity:
For sites with confidential or restricted content, it’s often best to avoid syncing hub permissions and manage access locally at the site level instead.
If your goal is to control who sees what in the navigation menu—without altering site permissions—audience targeting is a much better approach.
To enable audience targeting:
You can also target labels and parent links, and any sub-links beneath will inherit those settings. This creates a personalised navigation experience, users only see links relevant to their roles, departments, or locations.
This is especially useful in larger organisations where different teams may not need access, or even visibility, to every site within a hub.
When done right, global navigation and intelligent search turn SharePoint hubs from a simple collection of sites into a connected, user-friendly digital workspace. These features help users find what they need faster, move between key areas more easily, and make the most of their SharePoint environment.
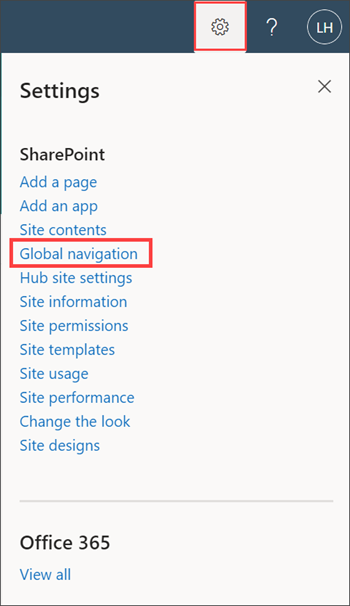
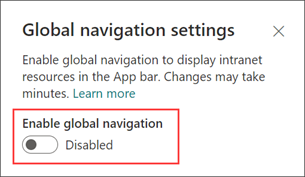
The SharePoint app bar provides a consistent, left-hand navigation panel that appears across all modern SharePoint sites. It offers quick access to personalised content like recent sites, news, documents, and lists, while also serving as a centralised navigation tool.
To enable global navigation:
Once global navigation is turned on, you’ll need to decide where it pulls its structure from:
This decision shapes what users see in the app bar across all SharePoint sites. For larger environments, where standard site navigation might be overwhelming or redundant, the app bar can act as your primary navigation tool, offering a cleaner, more focused experience.

Search plays a critical role in usability, and hub sites make it smarter. When a user searches from a hub, the results automatically include content from all sites associated with that hub, making it much easier to discover relevant information.
Here’s how search scope works by default:
You can customise this behaviour using PowerShell commands to change the default search scope to either Site, Hub, or Tenant (organisation-wide). When hubs are associated with each other, search functionality extends across up to three levels of association, creating a networked search experience that bridges related content automatically.
💡 Note: You’ll need at least site owner permissions to the home site to set this up. Users must also have read access to view the navigation links. It can take up to 24 hours for changes to roll out across all users.
Building effective SharePoint hub navigation is about more than just linking sites, it’s about creating a connected, user-friendly digital workspace that supports the way your teams work. By adopting a flat, flexible hub structure, you give users clear pathways to the content they need, without the complexity of deep hierarchies.
A multi-hub strategy offers greater clarity and scalability, allowing you to organise sites by department, location, or project while maintaining logical connections across your intranet. With less time spent searching and more time spent doing, your teams stay focused and productive.
If you’re planning a move to SharePoint or looking to optimise your current setup, CRT Network Solutions can help. We specialise in secure, efficient SharePoint migrations and offer expert guidance to help you build a well-structured, intuitive intranet from day one.
Ready to get started? Reach out to CRT Network Solutions today and let’s create a SharePoint environment that empowers your team and simplifies your digital workspace.
Request A Free Quote